Mastering the Art of Makeup: A Comprehensive Guide
Related Articles: Mastering the Art of Makeup: A Comprehensive Guide
Introduction
In this auspicious occasion, we are delighted to delve into the intriguing topic related to Mastering the Art of Makeup: A Comprehensive Guide. Let’s weave interesting information and offer fresh perspectives to the readers.
Table of Content
Mastering the Art of Makeup: A Comprehensive Guide
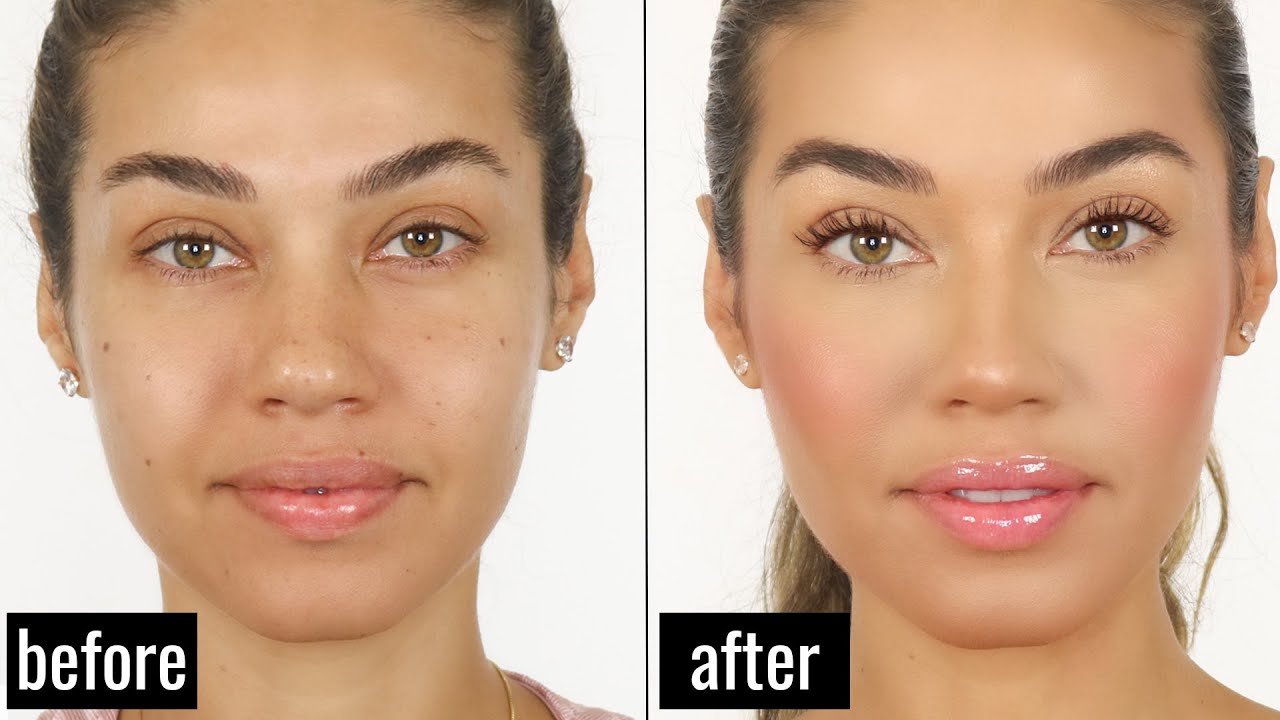
Makeup, a powerful tool of self-expression and enhancement, can be intimidating for beginners. However, with the right guidance and practice, anyone can confidently navigate the world of cosmetics and achieve desired looks. This comprehensive guide provides a step-by-step approach to makeup application, demystifying the process and empowering individuals to embrace their unique beauty.
Step 1: Preparation is Key
A flawless makeup application begins with a well-prepared canvas. This involves cleansing, exfoliating, and moisturizing the skin.
- Cleansing: Removing dirt, oil, and impurities from the skin is essential for optimal product absorption and a smooth finish. Choose a cleanser suitable for your skin type, be it oily, dry, combination, or sensitive.
- Exfoliating: This step removes dead skin cells, revealing brighter and smoother skin. Gentle exfoliation with a scrub or chemical exfoliant, like glycolic acid, should be performed once or twice a week.
- Moisturizing: Applying a moisturizer tailored to your skin type helps hydrate and nourish the skin, creating a supple base for makeup.
Step 2: Primer: The Foundation for Flawless Application
Primer acts as a barrier between the skin and makeup, creating a smooth and even surface for seamless application. It also helps to minimize the appearance of pores, fine lines, and wrinkles, prolonging the wear of makeup.
-
Types of Primers:
- Silicone-based primers: Offer a smooth, matte finish, ideal for oily skin.
- Hydrating primers: Provide moisture and a dewy finish, suitable for dry skin.
- Color-correcting primers: Neutralize redness or dullness, creating a more even complexion.
- Application: Apply a thin layer of primer to the entire face, blending it evenly with your fingertips or a makeup sponge.
Step 3: Foundation: Achieving a Flawless Complexion
Foundation is the base of any makeup look, providing even coverage and a uniform skin tone. Choosing the right shade and formula is crucial.
- Shade Matching: Test foundation on your jawline, ensuring it blends seamlessly with your natural skin tone.
-
Formulas:
- Liquid foundations: Offer buildable coverage and a natural finish.
- Cream foundations: Provide medium to full coverage with a dewy or satin finish.
- Powder foundations: Ideal for oily skin, offering a matte finish and long-lasting wear.
- Application: Use a foundation brush, beauty blender, or your fingertips to apply foundation, blending it outwards from the center of the face.
Step 4: Concealer: Camouflaging Imperfections
Concealer is used to cover blemishes, dark circles, and other imperfections, creating a more polished look.
- Shade Selection: Choose a concealer one or two shades lighter than your foundation to brighten the under-eye area and neutralize dark circles.
-
Formulas:
- Cream concealers: Provide medium to full coverage and a natural finish.
- Liquid concealers: Offer lighter coverage and a dewy finish.
- Stick concealers: Convenient for on-the-go touch-ups and targeted coverage.
- Application: Apply concealer to the under-eye area, blemishes, and any other areas needing coverage. Blend it out with a brush, sponge, or your fingertips.
Step 5: Setting Powder: Locking in Makeup
Setting powder helps to set foundation and concealer, preventing creasing and ensuring long-lasting wear.
-
Types of Setting Powder:
- Loose powder: Provides a light, airy finish and is ideal for all skin types.
- Pressed powder: Offers more coverage and a matte finish, suitable for oily skin.
- Translucent powder: Invisible on the skin, suitable for all skin tones.
- Application: Apply setting powder with a large, fluffy brush, focusing on the T-zone and any areas prone to oiliness.
Step 6: Eyeshadow: Enhancing the Eyes
Eyeshadow adds depth, dimension, and color to the eyes, enhancing their natural beauty.
- Choosing Eyeshadow Palettes: Select palettes with colors that complement your eye color and skin tone.
-
Application Techniques:
- Transition shade: A light, matte shade applied to the crease to blend and soften the look.
- Crease shade: A darker shade applied to the crease to add depth and definition.
- Lid shade: A brighter shade applied to the eyelid for a pop of color.
- Highlight shade: A shimmery shade applied to the brow bone and inner corner of the eye to brighten and enhance.
- Blending: Use a fluffy brush to blend eyeshadow shades seamlessly, creating a smooth and polished look.
Step 7: Eyeliner: Defining the Eyes
Eyeliner enhances the shape of the eyes, adding definition and drama.
-
Types of Eyeliner:
- Liquid eyeliner: Provides a precise and bold line.
- Gel eyeliner: Offers a creamy texture and buildable coverage.
- Pencil eyeliner: Easy to apply and smudge, ideal for a softer look.
-
Application Techniques:
- Winged eyeliner: A classic look that elongates the eyes.
- Cat eye: A dramatic look that creates a feline effect.
- Smoky eye: A sultry look achieved by smudging eyeliner along the lash line.
Step 8: Mascara: Lengthening and Volumizing Lashes
Mascara enhances the lashes, adding length, volume, and definition.
-
Types of Mascara:
- Volumizing mascara: Thickens and adds volume to the lashes.
- Lengthening mascara: Elongates and separates the lashes.
- Waterproof mascara: Resistant to water and sweat, ideal for swimming or humid weather.
- Application: Apply mascara from the root of the lashes to the tips, wiggling the wand to coat each lash evenly.
Step 9: Blush: Adding a Flush of Color
Blush adds a natural-looking flush of color to the cheeks, enhancing the complexion.
- Shade Selection: Choose a blush shade that complements your skin tone.
-
Application Techniques:
- Cream blush: Provides a dewy finish and is easily blended.
- Powder blush: Offers a matte finish and is ideal for all skin types.
- Liquid blush: Provides a natural-looking flush of color.
- Application: Apply blush to the apples of the cheeks, blending it upwards towards the temples.
Step 10: Bronzer: Contouring and Warming the Skin
Bronzer adds warmth and definition to the face, creating a sculpted look.
- Shade Selection: Choose a bronzer that is one to two shades darker than your skin tone.
-
Application Techniques:
- Contouring: Apply bronzer to the hollows of the cheeks, along the jawline, and the temples to create shadows and definition.
- Warming: Apply bronzer to the forehead, nose, and chin to add warmth and a sun-kissed glow.
- Blending: Use a large, fluffy brush to blend bronzer seamlessly, ensuring a natural-looking finish.
Step 11: Highlighter: Adding Luminosity and Dimension
Highlighter adds a touch of radiance and dimension to the face, emphasizing certain features.
-
Types of Highlighter:
- Powder highlighter: Offers a subtle glow and is easy to blend.
- Cream highlighter: Provides a dewy finish and is ideal for creating a natural-looking highlight.
- Liquid highlighter: Offers a more intense glow and is ideal for creating a dramatic look.
- Application: Apply highlighter to the cheekbones, brow bone, cupid’s bow, and the center of the nose to create a radiant glow.
Step 12: Setting Spray: Locking in Makeup for Long-Lasting Wear
Setting spray helps to set makeup, preventing it from fading or smudging throughout the day.
-
Types of Setting Spray:
- Matte setting spray: Creates a matte finish and is ideal for oily skin.
- Dewy setting spray: Adds a touch of radiance and is suitable for all skin types.
- Long-lasting setting spray: Extends the wear of makeup and prevents it from fading.
- Application: Hold the setting spray about 8-10 inches away from your face and mist it evenly over your entire makeup look.
Frequently Asked Questions (FAQs)
Q: What are the essential makeup brushes for beginners?
A: A basic makeup brush set should include a foundation brush, a powder brush, a blending brush, an eyeshadow brush, an eyeliner brush, and a mascara wand.
Q: How do I choose the right foundation shade for my skin tone?
A: Test foundation on your jawline, ensuring it blends seamlessly with your natural skin tone. Avoid testing foundation on the back of your hand, as this area may have a different skin tone than your face.
Q: What are the benefits of using a primer?
A: Primer creates a smooth and even surface for seamless makeup application, minimizes the appearance of pores and wrinkles, and helps to prolong the wear of makeup.
Q: How do I apply eyeliner without smudging?
A: Use a steady hand and apply eyeliner in thin, even strokes. Avoid applying eyeliner too close to the lash line, as this can cause smudging.
Q: How do I choose the right eyeshadow palette for my eye color?
A: Choose eyeshadow palettes with colors that complement your eye color. For example, blue eyes look best with warm browns, oranges, and golds, while green eyes are enhanced by purples, pinks, and reds.
Tips for Makeup 101
- Practice makes perfect: The more you practice, the more confident you will become with your makeup application.
- Start with a minimal look: Begin with a simple makeup routine and gradually add more products and techniques as you gain experience.
- Invest in quality products: High-quality makeup products will last longer and perform better.
- Don’t be afraid to experiment: Try different looks and products to find what works best for you.
- Clean your brushes regularly: This will help to prevent bacteria buildup and keep your makeup brushes in good condition.
Conclusion
Mastering the art of makeup is a journey of self-discovery and expression. By following these steps and incorporating the tips provided, individuals can confidently navigate the world of cosmetics and enhance their natural beauty. Remember, makeup is a tool for self-expression, and there is no right or wrong way to apply it. Experiment, have fun, and embrace your unique beauty.


Closure
Thus, we hope this article has provided valuable insights into Mastering the Art of Makeup: A Comprehensive Guide. We thank you for taking the time to read this article. See you in our next article!